Tagging of instances and changes
Motivation
Importers deliver the technical truth about an asset or configuration item: hostname, operating system, installed software, certificates, network interfaces. What they cannot deliver is your organizational knowledge about that asset — who owns it, which cost center pays for it, which service it belongs to, when its maintenance window is, or which contract covers it.
Tags close this gap. They allow you to store customer-specific data on assets & configuration items without touching the imported data.
Tags are stored separately from the instance state. Adding or removing a tag therefore does not create an instance change and does not interfere with the change history or with the data of the source system.
Typical use cases:
- Enrich instances with business context (owner, cost center, service, criticality, contract).
- Mark instances for a project, a migration wave or a maintenance campaign.
- Document a single change (for example
checked,approved by change #4711,false positive). - Use tags as separate fields in the reporting.
Tag model
A tag consists of a key and an optional value:
- Key only (for example
Migration 2026) — the tag works as a simple label. - Key and value (for example
Cost center=4711) — the tag works as a key-value pair.
A tag key exists only once per instance or per change. Writing an existing key again overwrites its value.
Versio.io distinguishes two tag types:
| Tag type | Scope | Where it is shown | API attribute |
|---|---|---|---|
| Instance tag | Valid for the complete instance, independent of its changes. | Below the current instance state. | instanceTags |
| Change tag | Valid for exactly one change of an instance. | Below the corresponding change in the change history. | changeTags |
Table: Tag types
Writing tags requires the permission versio.database:write and write access to the workspace of the instance. Reading tags requires read access only.
Usage of tags
Once tags are set, they are available in the following places:
- Instance viewer: instance tags below the current instance state, change tags below the corresponding change of the change history.
- Instance report: all instance tags are listed in the metadata table of the generated report.
- Reporting: each tag is available as a separate field.
- API: every instance response contains the attributes
instanceTagsandchangeTags.
Manual tagging via the web UI
Use manual tagging for individual instances and for knowledge that only a person can provide.
- Open the instance in the instance viewer.
- Click the tag icon in the toolbar of the Current instance state (for an instance tag) or in the toolbar of the corresponding change in the change history (for a change tag).
- Enter the Key (Required).
- Enter the Value if you want a key-value pair. Leave it empty for a key-only tag.
- Click Add tag.
The tag is displayed below the instance state respectively below the change. To delete a tag, click the x on the tag.
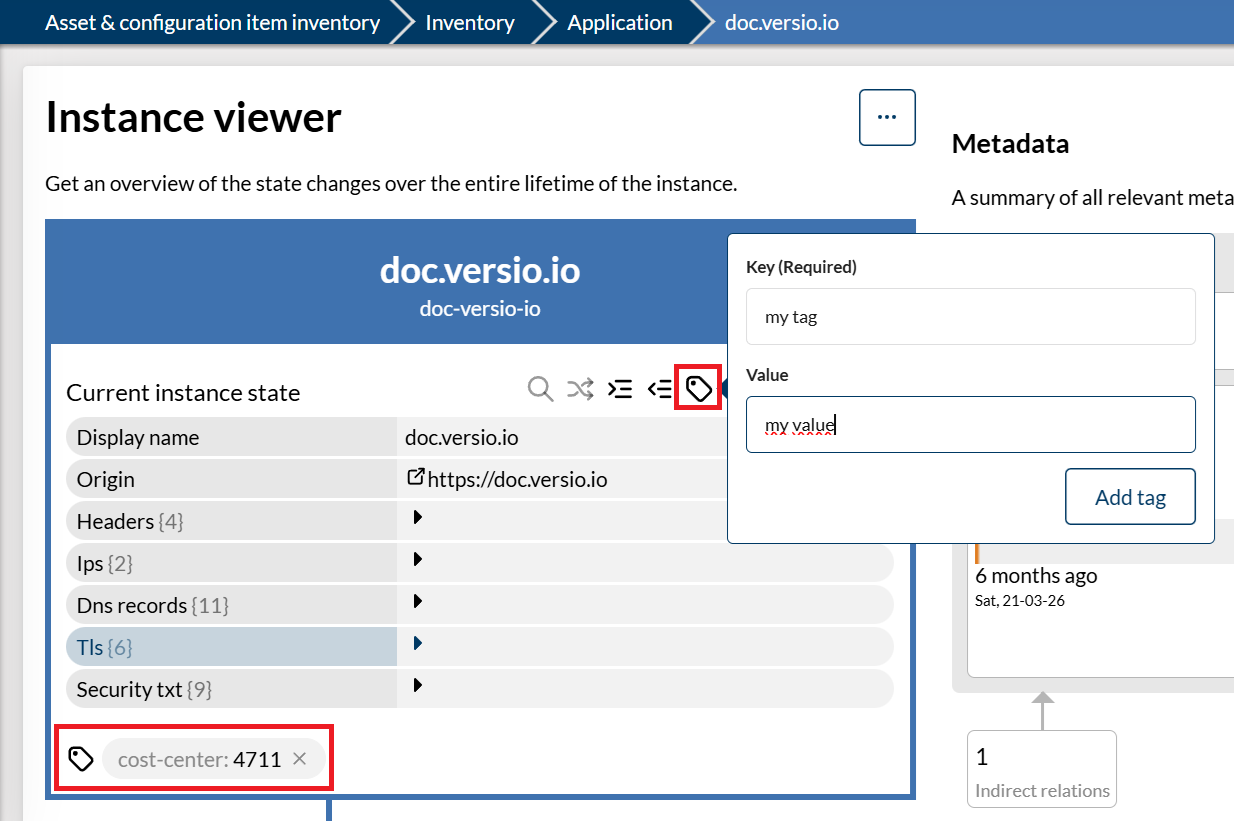
Figure: Add an instance tag in the instance viewer
The tag icon is only offered if your user has the permission versio.database:write for the workspace of the instance.
Info
Next to the tags, an instance and each of its changes can hold a note in Markdown format. Use the note for longer documentation and the tags for short, filterable facts.
Automated tagging via policies
Use policy-based tagging to tag many instances consistently and to keep the tags up to date automatically. The policy is executed every time an instance of the data set changes. If the rule result is True, the configured tags are written.
A tagging policy never creates a violation. Violation classification and severity are therefore not requested for this policy type.
Configure a tagging policy as follows:
- Select Environment settings -> Solution configuration -> Policy verification in the left navigation main menu.
- Open an existing policy group or create a new one.
- Define in tab Datasets the data set that selects the instances to be tagged, or use an existing one.
- Go to tab Policies, click Add policy and enter a self-explanatory Name.
- Select the required Action:
- Tagging an instance: the tags are written as instance tags.
- Tagging an instance change: the tags are written as change tags at the change that triggered the execution.
- Define the Tag key and, if needed, the Tag value (optional) for every tag the policy shall set. Use Add tag for further tags.
- Define the Rule that selects the instances to be tagged. A rule based on a logic or on JavaScript can be used. The tags are written when the rule result is
True. - Set the policy Active and save it.
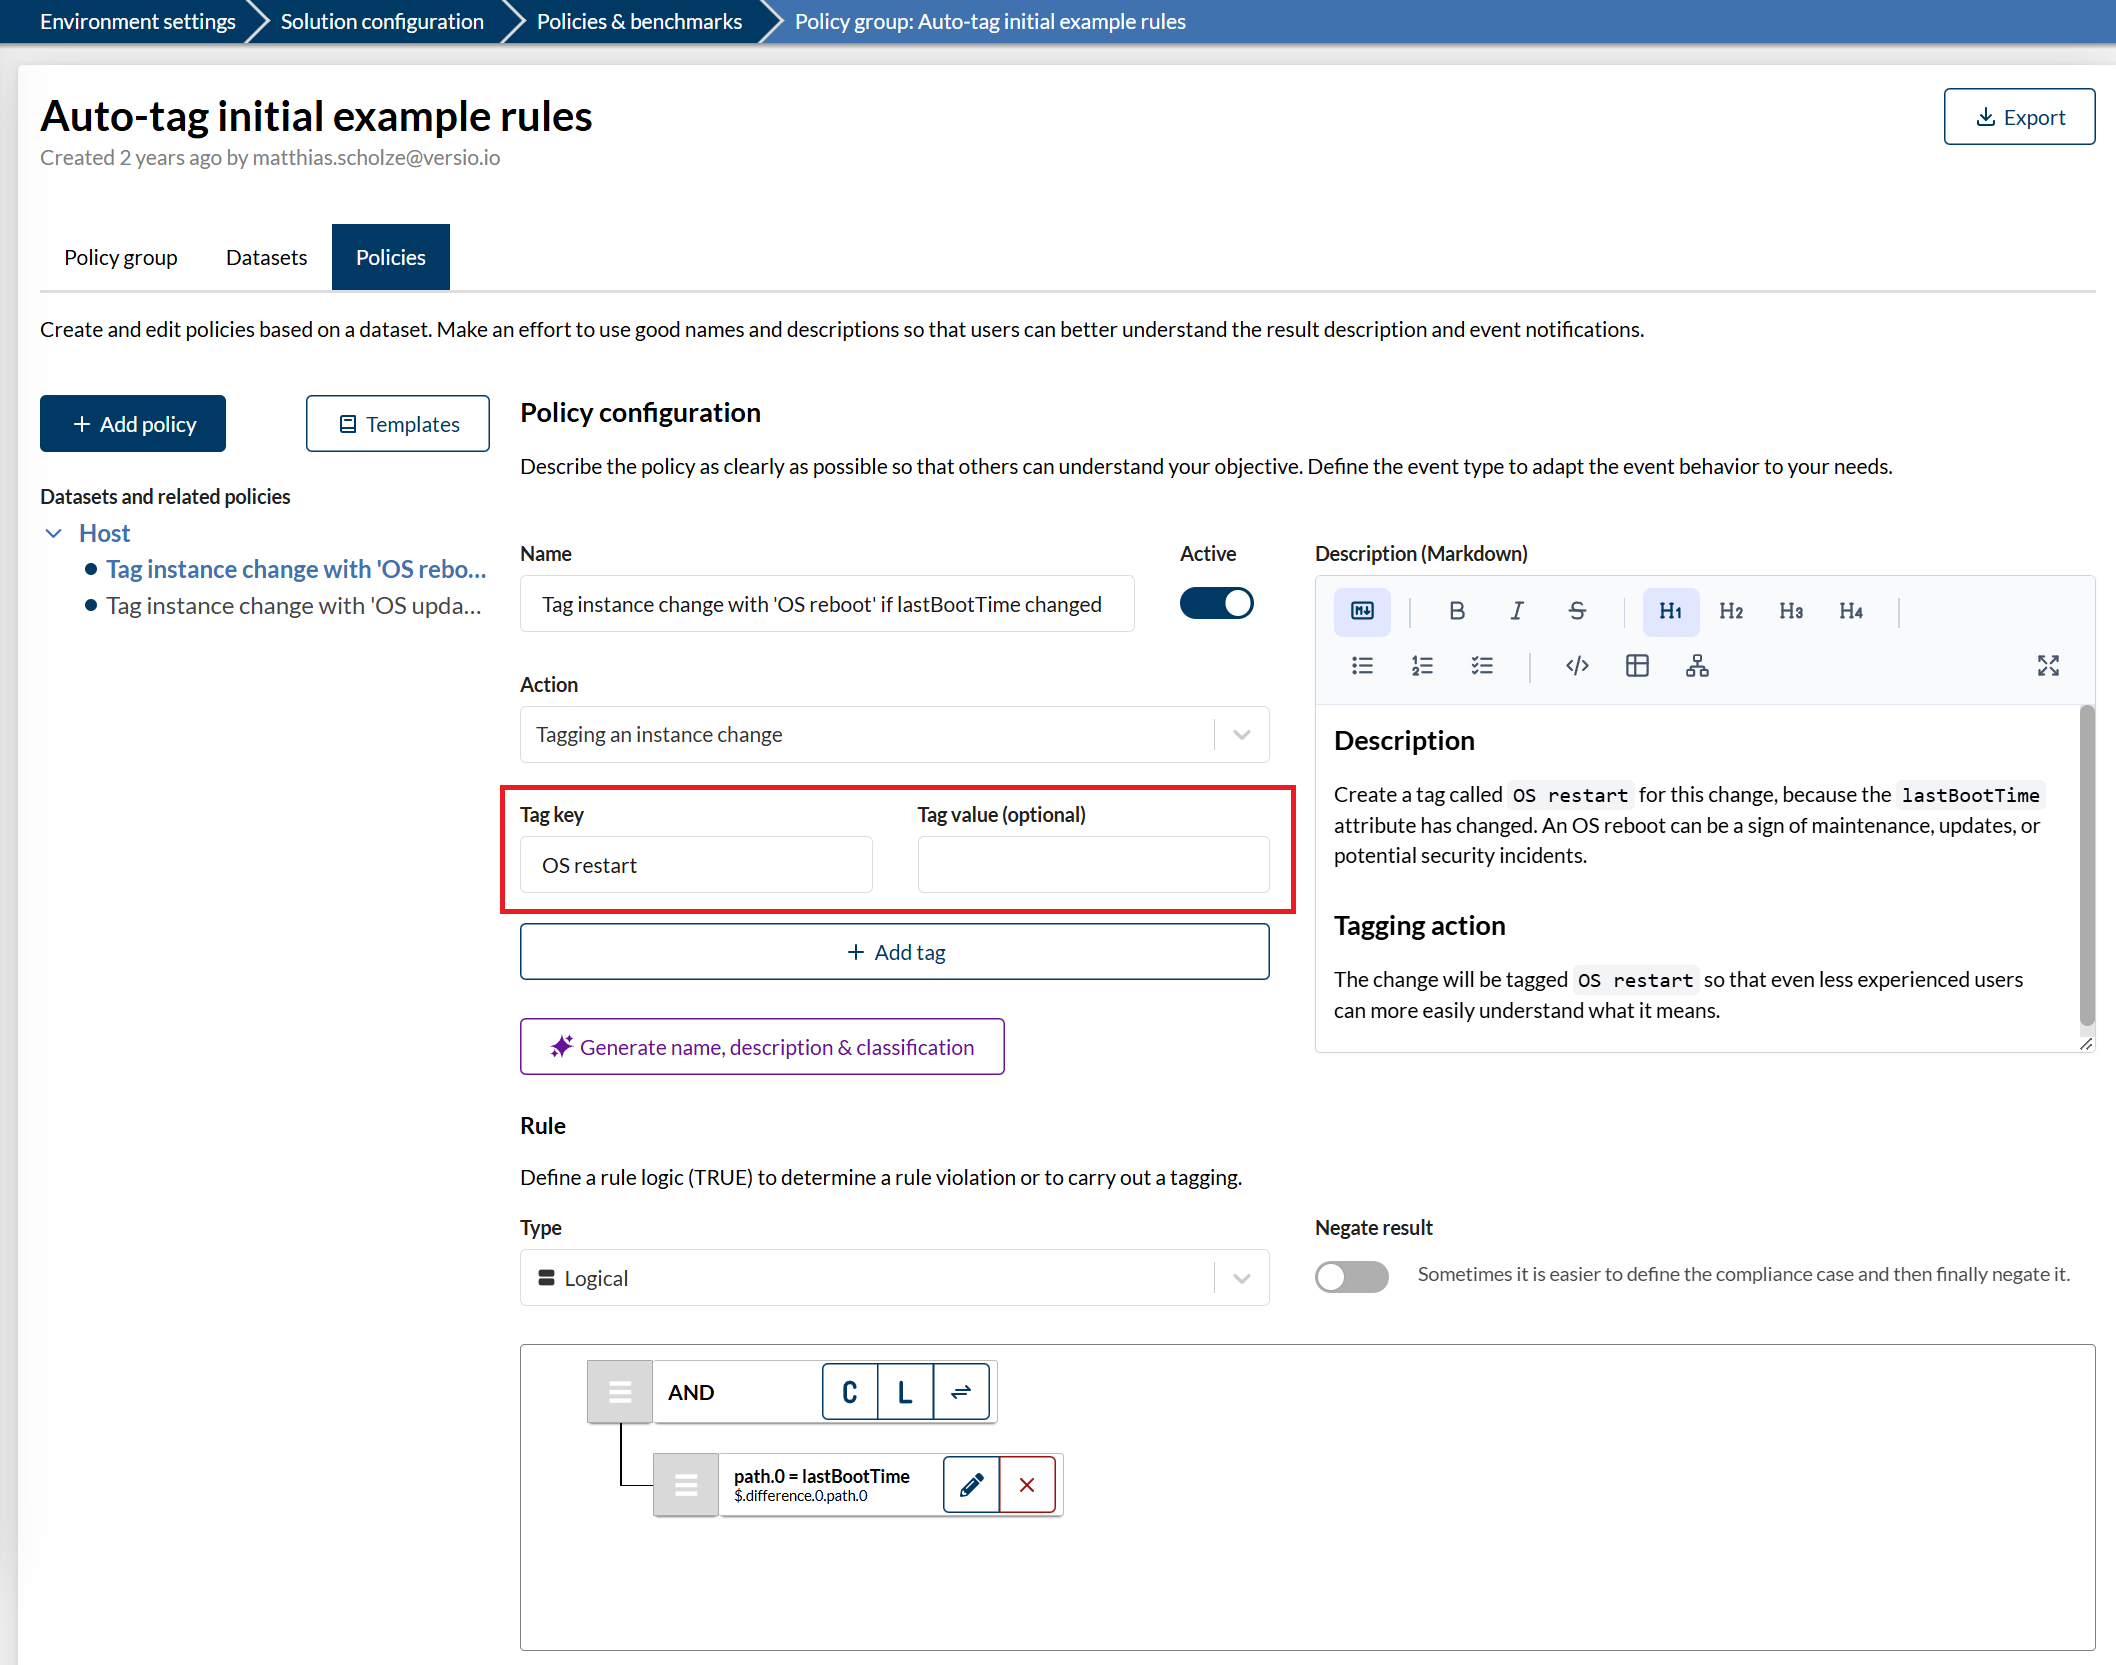
Figure: Policy that tags a change with OS restart if the attribute lastBootTime has changed
Example All Linux hosts whose hostname starts with
pveshall be marked as virtualization hosts. Action:Tagging an instance, tag keyRole, tag valueVirtualization host, rule: attribute path of the hostnamestarts withpve.
The definition of data sets, rules, conditions and attribute paths is described in detail in Policy definition.
Tagging via API
Use the API to tag instances from third-party systems, scripts or automation platforms.
Both requests address the tags of one instance:
POST <versio.io-server>/api-versio.db/1.0/<environment>/<entity>/<instanceId>/tags
PUT  <versio.io-server>/api-versio.db/1.0/<environment>/<entity>/<instanceId>/tags
The request body is an object whose keys select the tag type:
0addresses the instance tags.- A 13-digit UTC timestamp of an existing change addresses the change tags of that change.
Add tags
The value of each entry is an object with the tag keys and their values. Use null or an empty string for a key-only tag.
curl --request POST --header "Content-Type: application/json" \
     --data '{"0":{"Cost center":"4711","Owner":"team-infrastructure","Migration 2026":null}}' \
     https://live.versio.io/api-versio.db/1.0/MyEnvironment/MyEntity/MyInstanceID-1/tags?apiToken=yourToken
curl --request POST --header "Content-Type: application/json" \
     --data '{"1743152400000":{"Reviewed by":"m.mustermann"}}' \
     https://live.versio.io/api-versio.db/1.0/MyEnvironment/MyEntity/MyInstanceID-1/tags?apiToken=yourToken
An existing tag key is overwritten with the transmitted value. Tag keys consisting of whitespace only are ignored.
Delete tags
Tags are deleted with the PUT request. The value of each entry is an array with the tag keys to be deleted.
curl --request PUT --header "Content-Type: application/json" \
     --data '{"0":["Migration 2026"]}' \
     https://live.versio.io/api-versio.db/1.0/MyEnvironment/MyEntity/MyInstanceID-1/tags?apiToken=yourToken
Read tags
Tags are part of the instance response. The attribute instanceTags contains the instance tags, the attribute changeTags contains the tags of the respective change.
Info
Please use the Swagger REST API description for all detailed information.